[ad_1]
Back in early August, I wrote about my first impressions of the Rocky Mounts GuideRail 2″. It’s now been two months, a boatload of bike hauling and a 1900-mile round trip from Southern California to Bend Oregon and back with my Masi in the Guide Rail.
In case you didn’t read my last piece on this rack, the Rocky Mounts Guide Rail replaced my personal 1Up HD Double. As I mentioned in that post, I love the aesthetic of a tray-type hitch rack, like the Guide Rail and my old 1Up HD Double.
There were some glaring issues that I just didn’t care for on my 1Up rack and thought it would be a good idea to review the Guide Rail, using my experience with the 1Up to compare and contrast along the way.
Let’s get started.
A Tiny Bit o’ History
Rocky Mounts was founded in 1993, by Bobby Noyes in Boulder Colorado. With both Yakima and Thule well established back in those days, his goal with Rocky Mounts was to make a rack system that would work with either Yakima’s round bars or Thules’ square load bars.
The first RockyMounts racks were made with material sourced from within the US; plastic from Boulder, trays from Indiana, paint from Lyons and packaging from Denver, all assembled in a local garage by hand. It wasn’t until 2005 that they started moving production overseas due to efficiency issues with USA vendors, claiming that now only roughly 2% of their products are still made in the USA.
Rocky Mounts is still owned by Bobby, they are a small, private company of approximately 14 employees, and as of 2019, they are now operating out of Grand Junction, Colorado.
Outta the Box

Packed tight and small, the rack arrived with zero shipping damage.

Not too many small parts, plus the tools to install are included with very clear assembly instructions.
The rack came broken down into a pretty small package and was really simple to install, coming with very few small parts to deal with, clear instructions, and even the tools to get the installation done. I gave step-by-step assembly instructions in the other post.
How it performed

The Guide Rail, pulled down 30 degrees in the access mode to unload groceries.
The Guide Rail has been extremely good and I have no complaints to date. I keep it on my car 98% of the time, as my one-car garage is pretty tight, and it’s not a compact rack to store. Having it on my car all of the time means that I have loaded and unloaded it as well as lowered and raised the rack countless times. I don’t see the brass-clad pivot points wearing out any time soon.
When the rack is tilted down 30 degrees, in the “access” position, there is no “click” or notch that it goes into, which is nice, and means you don’t have to reach down under the rack to release the spine handle to move it back up. You simply lift and it pops back into the “carry” or “storage” position.

The Guide Rails ratchet release levers are great!
Easy To Use
The Guide Rail’s ratchet release levers are so convenient. When they’re flat and in the “normal” mode, they ratchet and hold as they’re supposed to, but when pulled open 90 degrees, they release completely allowing total one-handed loading and removal of your bike. This is easily one of my favorite features.
When compared to my 1Up’s release levers, it’s a game changer. On the 1Up, there was no “one-handed” operation to move the load arms down off the bike. When you release the bike from the 1Up load arms, you have to use both hands to 1.) press the release lever, and 2.) move the load arm off of your bike’s wheel… wasn’t so bad for the first wheel.
I ride alone a lot, so trying to move the second load bar by myself led to the possibility of the bike toppling and hitting my car. In my case, could mean a locking grip tapping my rear window just right, and then blammo, I would need a new rear window.
The Guide Rail eliminates that worry by making removal of the both of the uprights from your wheels a one-handed operation – leaving your other hand free to support the bike.
Adjusting for Different Wheel Sizes

Here is the adjustable bridge adjusted to carry my wife’s 26″ wheeled ‘Cuda with my 29er Krampus on the other tray.

The 27.5″ Marin Larkspur review bike. As you can see, I even used the 26″ spot for a 27.5″ wheel just fine.
Each of the load arms has an adjustable bridge. The aluminum bridge can be adjusted to better suit wheel sizes from 20″ up to 700c wheels (note that many kids’ bikes will not fit since it bottoms out at 20″). It’s actually not totally necessary to adjust the bars every time you switch between riding a 29er and a 27.5″ bike, as each spot can accommodate two different wheel sizes each.
For example, the top spot can hold either a 29er (700c) or 27.5″ (650b), the second spot down can hold a 27.5″ (650b) or a 26″, and the third spot down, can hold a 24″ or 26″…and so on. That’s super convenient, as I am swapping what I ride almost every other day…one day the 29er MTB, the next day my 650b all-road bike.
To adjust the wheel bridge, it just takes a 6mm Allen wrench and a 13mm box wrench – which are included with the rack.
Attaching it to the Reciever

Simple tightening the 19mm hitch pin to the receiver for anti-wobble
I really liked the way the Guide Rail attached to the actual hitch in all regards. First off, it fits into my receiver without any modifications, unlike the 1Up as mentioned in my other piece, where I needed to mod my receiver to fit the 1Up rack for my needs.
The Guide Rail although a smidge heavier, (49lbs compared to 1Up’s claimed 46), for some reason the Guide Rail felt lighter, so it seemed easier to attach and remove from the receiver.

The Guide Rail fit with no modifications, still tight when closed… stupid Subaru receiver placement.
The Guide Rail, when fully installed into my receiver, was still really close to the Outback’s bumper. But the Guide Rail still had enough room to close the rack into the storage position, and no modification was needed (unlike my 1Up). Obviously, this is an issue specific to my vehicle and hitch setup, but it is something that others may run into.
Simple tightening of the Guide Rail’s 19mm hitch pin to the receiver for anti-wobble. You can see the old modified hole where my 1Up rack was.

The Guide Rail hitch pin lock is in place.
Once the Guide Rail’s hitch bar is slid into the receiver, it is held in the receiver and tightened in place by the proprietary hitch pin with the included 19mm tool. If the Guide Rails tool is misplaced, don’t fret… a good ol’, every day, 19mm wrench will do as well. There’s also a keyed lock on the end of the hitch pin to keep the hitch pin from unwanted removal.

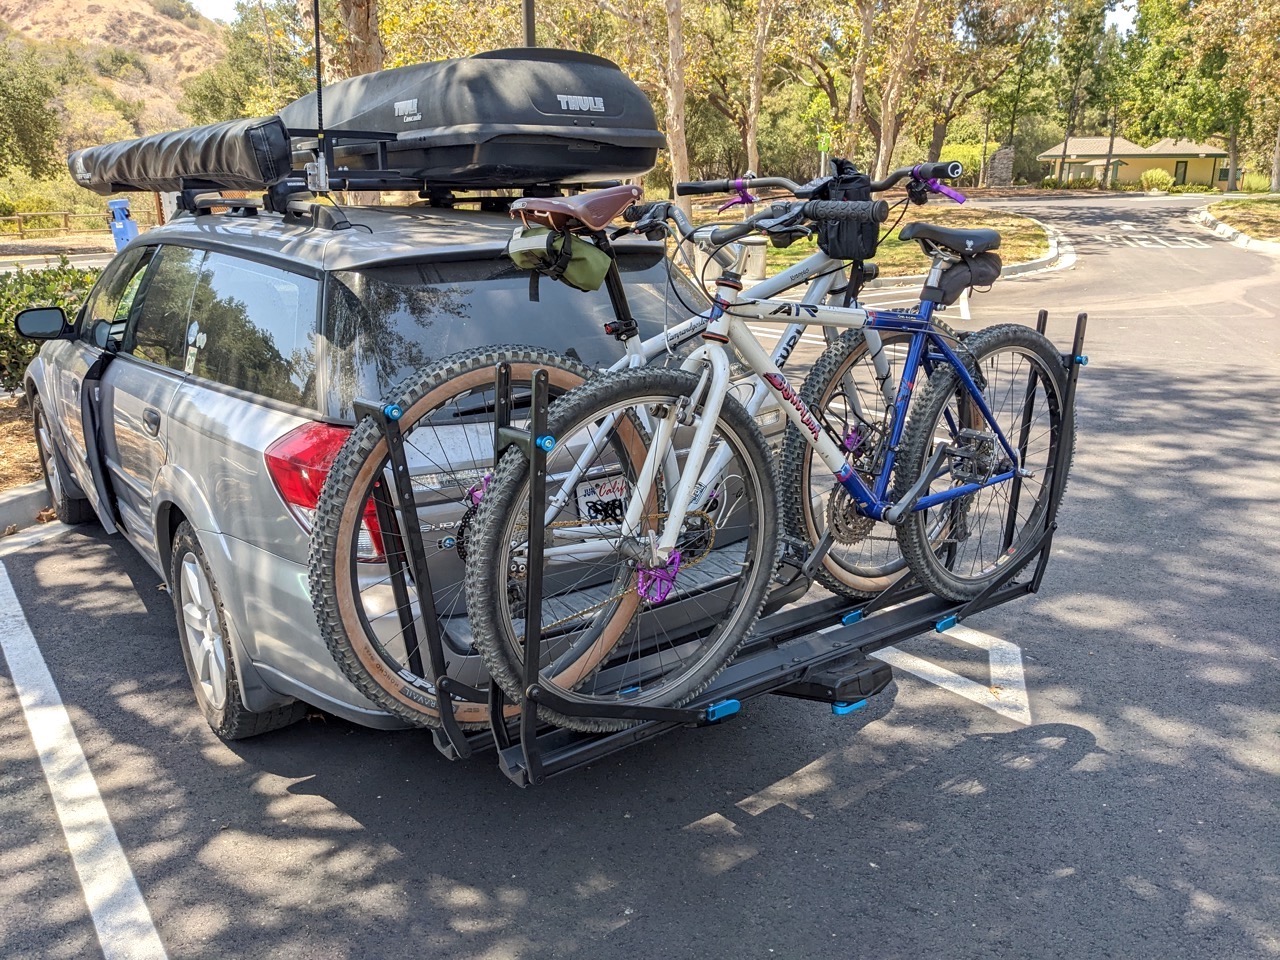
The handsome GuideRail in the “carry” position from the back
As you can see in the photo above the Guide Rail’s trays are like stadium seating (not unlike the 1Up), allowing for asymmetric bike loading to avoid handlebar interference. Also, the trays are wide, accommodating a wheelbase as small as 36″ and up to 55″. This means, in most cases, you would have enough room to shift the bike and load arms left or right, further aiding in eliminating handlebar interference.
The Guide Rail carries two bikes and has a weight capacity of 60lbs per tray (120lbs total). The 2″ hitch version of the Guide Rail is expandable to three bikes with an add-on, moving the weight limit to 45lbs per tray.
The rack can accommodate 19mm road tires up to 3″ mountain bike tires with wheels sizes from 20″ up to 29″.
Locking the Bike to the Rack
Another benefit of the Guide Rail over my 1Up is the fact that the Guide Rail came with a lock. Not a typical small, integrated cable lock like most other racks, no. The Guide Rail came with a lock that reminded me of Kryptonite Locks’ New York Fahgettaboudit Chain… you know the one I’m talking about. The Guide Rail lock is a 10mm square link chain that Rocky Mounts says offers “best in class security”.

The Guide Rail burly chain lock.
I have had many, many racks of all kinds in my day, and the ones that had integrated locks were, in my opinion, theft deterrents at best. When stopping for a post-ride lunch or frosty beverage, I would lock my bike to the rack with the provided cable, but would still park in a spot where I could eyeball my bike.

My Krampus locked down to the Guide Rail… look elsewhere bike thieves!
I don’t feel this way with the way Rocky Mounts designed their locking system, I feel that the Guide Rail’s locking system is not only a massive deterrent but is a real lock that really protects my bike from being stolen. The actual chain itself is separate from the rack, but the locking mechanism itself is integrated into the rack, in an indiscreet way.
The chain is relatively short, so you’ll have to make a lasso around one bike frame and possibly rear wheel, then thread it through the frame of the second bike and into the rack. It won’t protect all of the wheels, but it should keep someone from quickly swiping the bikes off the rack.

A thick hardened steel pin keeps the lock in place.

When not in use, the lock becomes barely visible.
The key for the integrated lock is the same key that locks the hitch pin, so that’s nice…. expected sure, but nice. Another thing that’s nice, and really adds to the high-end aesthetics of the Guide Rail is the signature light blue anodized touch points. I really like the way it “pops” against the all-black color of the rack.

Rocky Mounts Low-Key branding for the Guide Rail
The low-key branding is really pleasant as well, again adding to the high-end aesthetics of the Guide Rail
The Release Mechanism

The GuideRails blue anodized spine handle.
The Guide Rail’s spine handle is easy to access and really easy to pull to adjust the rack into its three different positions. There isn’t much else to say about this feature, because it is really just a no-brainer. It’s smooth and works perfectly because it’s designed well, making accessing the rear hatch of the Subaru pleasant and easy, whether loaded or unloaded with bikes.
I have no issues with keeping the Guide Rail on my car all of the time.
I talked about the 1Up’s rack release mechanism a little in the first post. This was my biggest pet peeve about my 1Up rack. This issue has been addressed on the new Equip-D models, but any of the non-Equip-D models still suffer from a tilt mechanism that can be difficult to operate.

1Up’s “black bar” (horizontal flat bar inserted in the side notch of the rack) with the EZ Pull extension handle (that I had to buy separately) attached.
I can spend a lot of time talking about this, but I will just say that when I first bought the 1Up, I was a little shocked that to release the rack and move it into any of the three positions, you had to reach down and manually disengage what they call the “Black Bar”. It sounds easy enough, but in my opinion and experience, it was more difficult than I would like it to be… even with the additional purchase of their EZ-Pull handle.
Perhaps the reason the release mechanism is so burley and hard to deal with, is that the 1Up HD Double is rated for off-road use. Regardless, the Guide Rail is much easier to use and I kept the 1Up rack OFF of my car as much as I could.

The additional “EZ-Pul” was added to make moving the 1Up rack easier.
In Conclusion

Plenty of room to close into the storage position, no modification needed.
The Guide Rail, quite frankly, addresses every one of my perceived design shortcomings of the 1Up HD Double.
I find the Rocky Mounts Guide Rail to be an awesome rack system. I have used it for many miles and have put it through many cycles of the ol’ “up and down” finding that all of the joints and pivot points remain tight and still feel new showing no signs of wear yet.
It is aesthetically pleasing, as well as a very high-quality rack while not looking bulky behind the Outback. It’s easy to use, and perfect to carry and protect our precious steeds. Speaking of precious steeds… with the cost of bicycles these days, you want a well-made rack to carry them to the trailhead or the meeting spot for your Saturday club ride.
And with that said, the $850 price tag of the Guide Rail, although competitive, is not inexpensive. It’s tough to make an apples to apples comparison since the Guide Rail includes features that the 1Up HD does not, but if you were to add the EZ Pull and Chain Lock to a black 1Up HD Double, you’re looking at $947 before shipping. A better comparison would be the newer 1Up Equip-D Double which starts at $805 without a lock for the bikes. 1Up’s (much longer) chain lock would add another $165 to that for the 2-bike version.
For those looking for a tray-style rack that’s easy to use, I’d recommend the Rocky Mounts Guide Rail. It is a well-thought-out rack, with conscientious design features.
The Guide Rail comes with Rocky Mounts Limited Lifetime Warranty.
Rocky Mounts Guide Rail Features:
- Carries 2 bikes, up to 60 lbs per tray (120 lbs total). Expandable to 3 bikes up to 45 lbs per tray, with Add-On (2″ Only)
- Bike can be loaded asymmetrically to eliminate handlebar interference
- No contact with frame or fork, secures bicycle by contact with tires only
- Carries 19mm road tires up to 3.0” wide mountain bike tires, and diameters from 20” to 29”
- Compatible with bicycle wheelbases from 36” to 55”
- Folds flat against the vehicle, and tilts down 30 degrees to allow for hatch access
- Available for 1.25” and 2” Class II or higher hitch receivers
- Utilizes RockyMounts premium 3-axis anti-wobble system
- Included 10mm square link chain provides “best in class” security
- Not for use with fender-equipped bicycles
- Rack weight 49 lbs (shipping weight 61 lbs)
- Fit Memo- For cargo vans a fit check is required. Depending on hitch manufacturer, handlebar width, vehicle wheelbase, and accessories an 8″ Hitch Extension may be required for handlebars to clear the door.
[ad_2]
Source link